
By Erin Turowski from Less Bitching, More Stitching!
Hi! My name is Erin, and I am a craftaholic. I think that puts me in good company here. :)
All kidding aside, I am so happy Julie invited me to guest blog for DDH! This is my first guest feature for a blog other than my own, and I am excited to write for a new and fresh audience. A little bit about me: I am a veterinarian by day and a textile artist by night. My craft of choice is cross stitching, so I will be showing you all how to frame finished needlework pieces. If you like this tutorial and would like to read more about finishing tips or cross stitching in general, please visit my blog, “Less Bitching, More Stitching!” at http://lessb1tchingmorestitching.blogspot.com/.

Framing your finished pieces adds style and value and makes your creations more attractive to potential buyers who are looking for “ready-to-go” artwork. However, professional framing can be quite expensive, especially for large or irregularly shaped pieces. I am going to show you how to frame your own finished pieces using just a couple of dollars’ worth of materials! By the end of this tutorial, you will be able to produce a high quality, professional-looking framed piece without investing the time and money you would otherwise spend taking your fabric art to a framing store. This technique can be applied to any sort of fabric-based needlework: embroidery, needlepoint, latch hook, beadwork, and many more styles.
You will need the following materials:
* Your finished piece
* Appropriately sized frame (and mat, if desired)
* Ruler
* Pen or pencil
* Acid-free foamboard
* Craft knife
* Straight pins
* Needle
* Strong thread (I use six-strand cotton embroidery floss)
* Scissors
Before we begin, I want to say a few words about glass. I prefer the way cross stitched pieces look framed without glass: the glass is not generally necessary, it can create glare and obscure your delicate stitchery, and some types of glass contain trace levels of acid that may actually damage your needlework over time. Plus, if you are trying to fit both foamboard and glass into a frame, there might not be enough room for both. If your finished piece is going to be placed in a smoker’s home, however, the glass will help protect the fabric from ash and smoke deposits, so keep that in mind.
Now… allons-y!
First of all, make sure your finished piece is clean and ironed. This is your last chance to make it look its best! You can iron it wrong-side-up under a damp washcloth to remove hoop marks and wrinkles.
Take the back off of the frame and remove the glass. Now, measure the inside edge of the back of the frame to verify it is the proper size for your needlework. Wouldn’t you hate to have to un-mount your finished piece, re-cut the foamboard, and re-mount the piece, all because you didn’t measure the frame before you started? The scientist’s mantra, “Trust, but verify,” applies to framing as well as lab experiments!

You will want your foamboard to be slightly smaller than the frame to allow room for the fabric, so subtract 1/8” (0.3 cm) from both the length and the width of the inside edge to obtain the proper dimensions for the foamboard. Mark the foamboard with the adjusted dimensions and use a craft knife to trim the foamboard to the correct size. My frame was 5” x 7” (12.7 cm x 17.8 cm), so I cut my foamboard to 4 7/8” x 6 7/8” (12.4 cm x 17.5 cm).


Next, center your needlework piece over the foamboard. Affix the piece to the foamboard by sticking the straight pins perpendicularly into the edge of the foamboard. It’s going to look a little reminiscent of Frankenstein, but don’t worry, the pins are temporary.
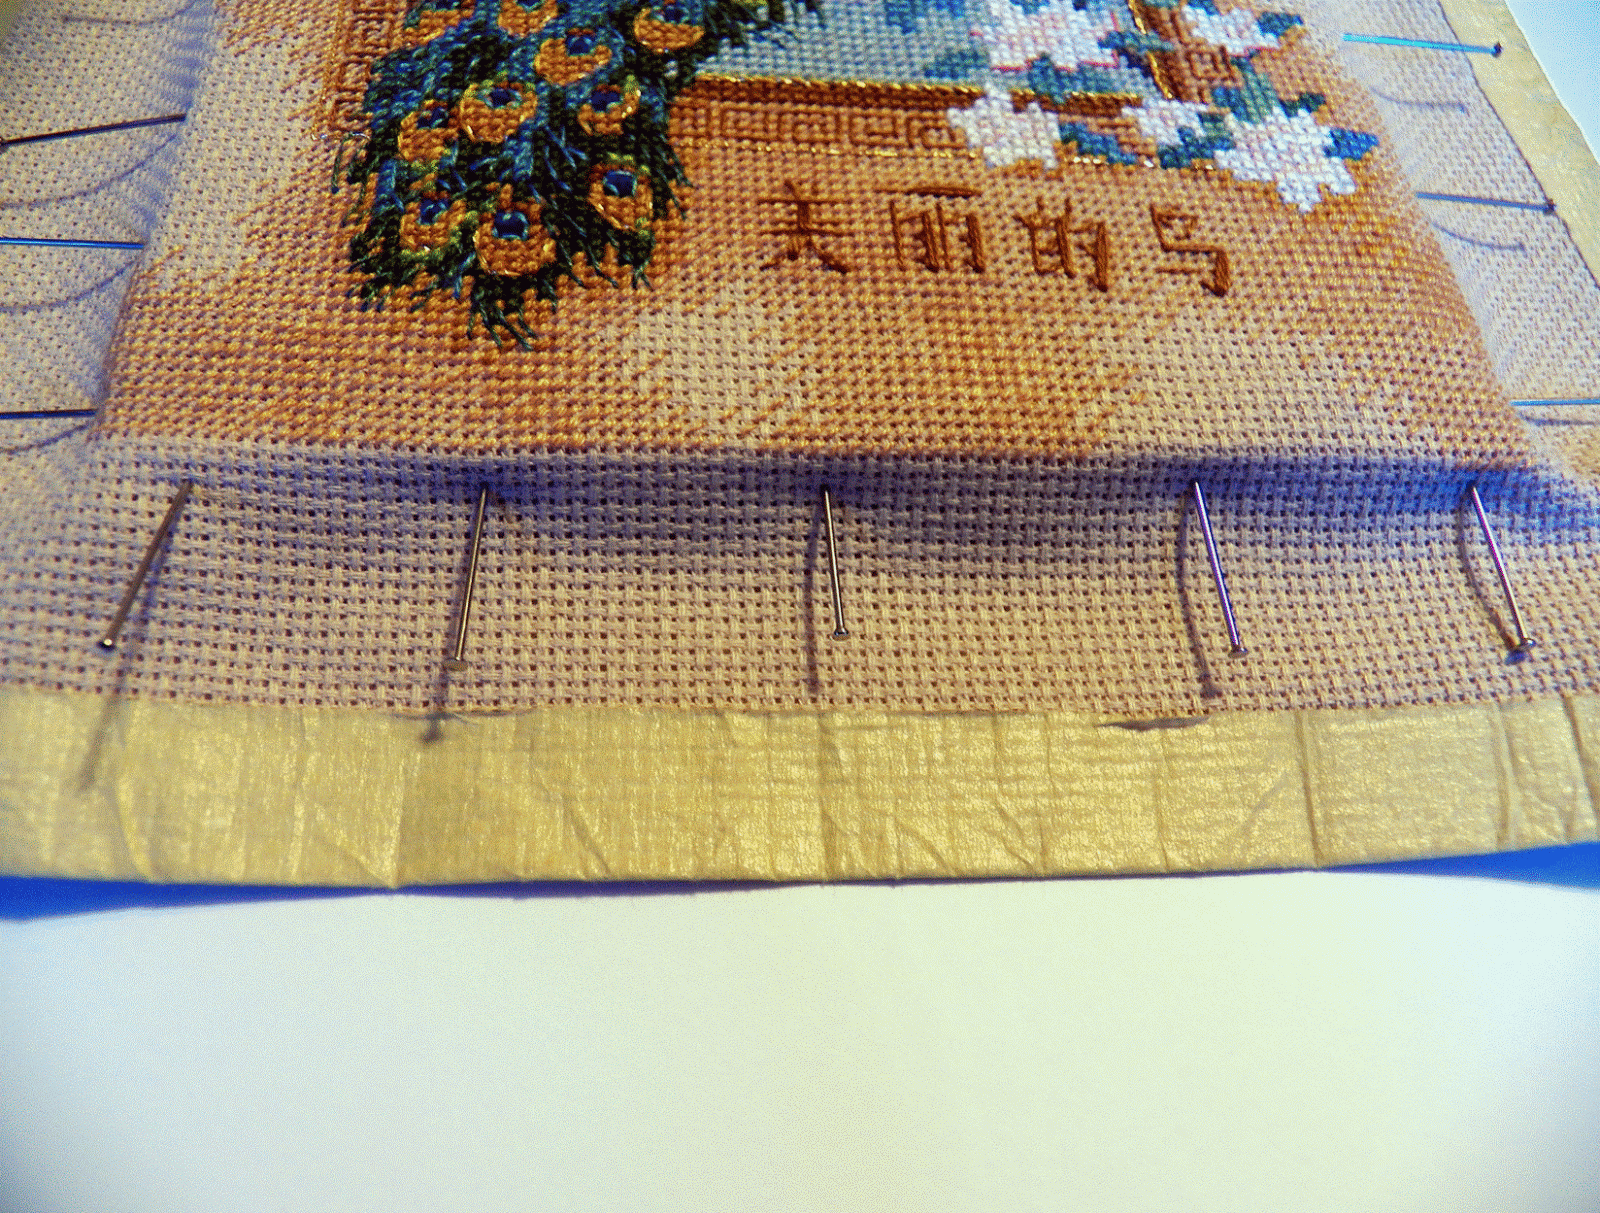
Continue so the straight pins are attached all the way around the edge of the piece. Make sure the piece is straight and centered on the foamboard. If you need to adjust the fabric, you can remove and re-position the pins until the piece is perfectly straight and centered. Here is what it should look like when you are done:

Now, turn the piece over so you are looking at the back. Fold in the corners like you are wrapping a present, then fold in the sides. You can place a straight pin across each corner fold to keep the fabric folded if you wish.


Next, thread the needle and tie a knot at the tail end. Lace the thread across the fabric as if you were tying shoes or a corset. Stitch one pair of opposite sides together first, tie off the thread, and then repeat with the remaining pair of sides.

Remove all of the straight pins, insert the mounted piece into the frame, and attach the back of the frame.
There! Wasn’t that easy? Framing your own pieces really brings the finished needlework together and allows you to offer a ready-to-display piece of needle art at a competitive price. To be even more cost-effective, you can look for frames at thrift stores. The brand new pine frame in this tutorial cost me a whopping $1.99 at Goodwill! Also, you can be creative with your materials if you need non-standard frame sizes – I had a long, narrow cross-stitched monkey, and I made a frame for him using the lid of an old tapestry-style jewelry box! Stop by my blog in the near future for an upcoming tutorial on how to create frames from random wooden objects.
Thanks again to Julie and Cylene for inviting me to be part of the DDH community. If you like what you see in this tutorial, please visit my blog “Less Bitching, More Stitching!” at http://lessb1tchingmorestitching.blogspot.com/ for more tutorials, finishing tips, and my cross stitch projects. You can also visit my Etsy shop at http://www.etsy.com/shop/LessBtchMoreStitch to browse my finished projects.
I really enjoyed writing for all of you. Thanks for reading, and happy crafting to you all!
-Erin
Less Bitching, More Stitching!
http://lessb1tchingmorestitching.blogspot.com/
http://www.etsy.com/shop/LessBtchMoreStitch
Great tutorial, very detailed! I'm going to try this with some of my embroidery, it gets old just displaying it in the hoop every time. Thanks!
ReplyDeleteYou do lovely work.
ReplyDelete♥♥♥
Sue
Enjoyed your expertise and looking forward to your next framing tutorial!
ReplyDeleteI spent all day yesterday trying to find an inexpensive frame for an embroidery piece I just finished. Forgot all about the goodwill!
ReplyDeleteThanks for the post :)
Nice Tutorial!!
ReplyDeleteGreat post however , I was
ReplyDeletewondering if you could write a litte more on this topic?
I'd be very thankful if you
could elaborate a little bit more. Thanks!
Stop by my page do-it-yourself solar powered hot water
Although unfit and obese guys are constantly appeared down upon as lazy and weak.
ReplyDeletemy website; http://www.getfitnstrong.com/adjustable-dumbbells/weight-sets-sale/
If you'd like to be aware of the real purpose as to why these bands tend to be more powerful than other exercise products, pay back near consideration below.
ReplyDeleteMy web blog adjustable dumbbells
Other than regular push-ups, you'll find leading-edge ways to challenge your energy and balance that may get you get to your fatigue limit sooner than you would expect.
ReplyDeleteMy page - bowflex select tech dumbbells
It's got four separate Lcd displays screens which lets the consumer keep track of the intensity level of their training session.
ReplyDeleteLook at my web-site; getfitnstrong.com
By this, I imply just establish that which you anticipate to be applying the dumbbells for; whether it is subsequent an intense conditioning system demanding the regular
ReplyDeletefluctuation of a lighter excess weight, or possibly a heavier lifting system to permit you to add bulk, etcetera.
my homepage :: www.getfitnstrong.com/bowflex-dumbbells/reviewing-bowflex-selecttech-552-adjustable-dumbbells-pair/
Remaining a person that was totally outside of condition, I used to be intrigued
ReplyDeleteby what I noticed.
Here is my webpage - incline dumbbell curls
Adjustable dumbbells that use urethane-coated excess
ReplyDeleteweight plates may be adjusted without having making loads of clanging, creating them the desired solution
by men and women dwelling with roommates who can't afford to pay for to help make sounds.
Feel free to visit my website; Different Body Types Explained - Ectomorph
You'll be able to complete much more than 200 work outs within the Entire body by Jake Tower 200, such as every one of the primary exercises also as specialised, muscle isolating routines.
ReplyDeleteFeel free to surf to my blog post - http://www.getfitnstrong.com/adjustable-dumbbells/7-reasons-adjustable-dumbbell-set/
oakley sunglasses
ReplyDeleteugg boots clearance
michael kors handbags
michael kors
weitzman shoes
ray ban
uggs
ray ban sunglasses
longchamp
adidas trainers uk
2017.12.9chenlixiang
EN SON ÇIKAN PERDE MODELLERİ
ReplyDeleteSms Onay
MOBİL ODEME BOZDURMA
NFT NASİL ALINIR
ankara evden eve nakliyat
trafik sigortası
DEDEKTOR
Kurma.website
ask romanlari
smm panel
ReplyDeletesmm panel
iş ilanları
İNSTAGRAM TAKİPÇİ SATIN AL
Hirdavatci burada
beyazesyateknikservisi.com.tr
SERVİS
tiktok jeton hilesi
Good content. You write beautiful things.
ReplyDeletetaksi
vbet
sportsbet
korsan taksi
vbet
hacklink
sportsbet
hacklink
mrbahis
Good text Write good content success. Thank you
ReplyDeletetipobet
slot siteleri
betpark
kralbet
kibris bahis siteleri
betmatik
poker siteleri
mobil ödeme bahis
https://saglamproxy.com
ReplyDeletemetin2 proxy
proxy satın al
knight online proxy
mobil proxy satın al
KKC
شركة مكافحة حشرات بالجبيل aAPackwAM0
ReplyDeleteشركة تنظيف مكيفات بجدة
ReplyDeleteDJKNB6QPbQ
شركة نقل عفش بالجهراء
ReplyDeletes5ypoV
Awesome content, keep it up.
ReplyDeleteاشركة تخريم خرسانة